 |
| FAQ – Frequently asked questions
Frequently asked questions about our products
Do you have a question about one of our products? Take a look at our FAQ, you will often find the right answer here.
FAQ: easyTRX2-IS
FAQ: easyTRX2-IS >>>
There is only one difference between both devices -> the splitter.
So we disclaimed to print an extra manual.
You can have a look at the manual here …
The splitter-function is under 3.7.1.
FAQ: easyTRX2-IS >>>
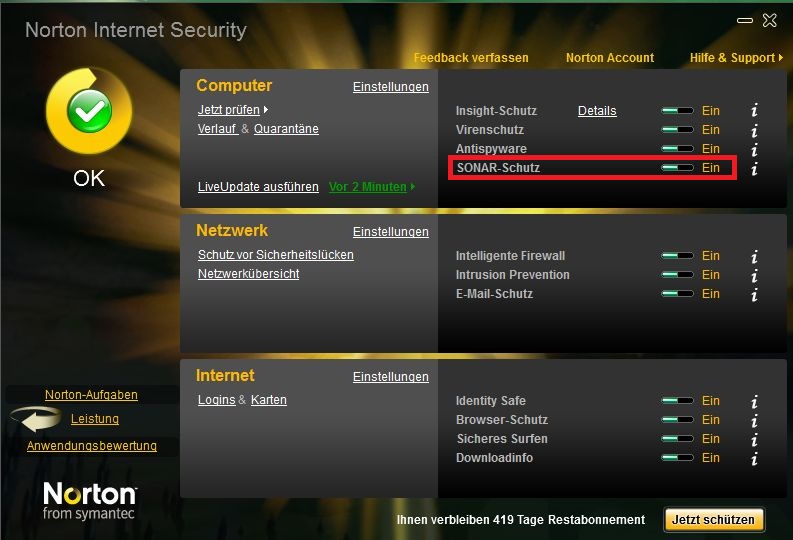
If you use Norton as Antivirus program that could be the problem.
Norton SONAR does not know these *.exe-file of our Programming-Tool.
It will be deleted. So for the time you program the device you could disable this SONAR-protection. You can set it in your Norton Programm Interface.
FAQ: easyTRX2-IS >>>
The AIS Receiver of the other ship is overloaded. It means the AIS receiver is getting to high signal from the easyTRX/ -IS. Cheap AIS receivers (made in China …) can be easily overloaded by a strong AIS signal. If you use products of weatherdock company you certainly don’t have the problem with overload of the AIS receiver. All our products are absolutely overload-save.
This can caused by a lot and you cannot say it easy. To solve the problem please connect by USB to your PC and open the Programming-Tool.
Under the page “Diagnostic” you can see the error.
VSWR exceeds limit:
The easyTRX2 / S measures after every transmission how much power was sent to your antenna(Forward power) system and how much of it comes back(Reverse power). The easyTRX2 / S use these values and calculated if your antenna is good or bad. An error is reported when the “Forward TX power” no longer is worth at least 3 times higher than the “TX reverse power”. You can find these values in our Programming-Tool.
If this happens, please check your antenna system and whether all adapters and connectors are properly connected.
A defect of the easyTRX2/S you can find out with the following steps:
1. Make a note of “TX power forward” and “reverse TX Power” if your unit is sent with attached antenna.
2. Now disconnect the antenna and wait for 6 minutes. If the values differ only low (about 30), so please contact our technical support.
Reasons can be various.
Amongst other things, the reason could be that you are out of range of the receiving station of this web-services.
Also it could take some time to see all your data there, it is not 100 percent live!
To check if the other vessels receive your position, just ask them by your VHF radio.
This is the easiest and most effective way.
- Connect to your easyTRX2S WiFi network (network name SSID and Password are found at the bottom of your unit).
- Open your AIS Software
- Go to the Software settings page
- Select somewhere AIS data and Data source
- Source:
- Standard: TCP/IP, IP: 192.168.16.254 Port 8080
- Older WiFi-Units: TCP/IP, IP: 192.168.10.1 Port: 5101
If you software does NOT support data by TCP-IP connection, you need to generate a virtual COM-Port.
Here we recommend to use the tool from www.eterlogic.com, here TCP-Data are virtually send to a COM-Port.
This new COM-Port is the source in your AIS Software for AIS data.
When you need further assistance you can send us an email to support@weatherdock.de
Step-by-Step Guide: Resetting your easyTRX Unit (1st and 2nd Generations)
Please follow these instructions carefully to perform a factory reset. This is required to change the MMSI number.
This reset will not change any settings you made in your WiFi-Module, only static ship data will be set to factory state.
1. Compatibility Check
This instruction is valid ONLY for the following models:
- easyTRX 1. Generation

- easyTRX2
- easyTRX2S


Important for easyTRX3 / easyTRX3S:
Please follow this specific link for easyTRX3 models.
2. General Information
- A factory reset does not influence WiFi settings.
- Only the manufacturer or distributor is authorized to perform this reset.
- If you have WiFi issues: This reset will not help. Use the “Reset WiFi” function in the programming tool instead.
Before proceeding: Please check our current Service-Times under “Technical support”.
3. Preparation & Requirements
-
- Remote Access Software:
- Download DW-Service (www.dwservice.net) OR Teamviewer (get.teamviewer.com/hdetkvr).
- No installation required – you can just run the software.
- Keep the window open so you can see your ID and Password.
- Programming Tools (Windows only):
- easyTRX2 / TRX2S: Download Link
- easyTRX 1. Gen (#A023): Download Link
- Unzip the file and install the software.
- Hardware Connection:
- Connect your unit to 12/24V power supply.
- Connect via USB to your Windows PC (Mac is not supported).
- Driver issues? If the USB port is not recognized, download the VCP Driver here.
- For easyTRX 1. Gen: Use a USB to RS232 adaptor. (Manuals: Hardware / Software)
- Remote Access Software:
4. Execution Steps
-
- Establish Connection:
- Start the Programming Tool.
- Select the COM port (usually the highest number) and click “Connect”.
- A green bar showing “connected” should appear.
- Contact Support:
- Send an email to with your ID and Password or call us at +49 911 376638-57.
- No appointment needed – just reach out during Service-Times.
- The Factory-Reset:
- We will log onto your PC and perform the reset. Please close all other programs.
- The reset will delete MMSI, ship name, call sign and dimensions (mounting position of GPS Antenna), please remind data you want to program later again.
- Finalize:
- You can now enter your new vessel data. Note: MMSI can only be programmed once!
- Click “Program to easyTRX” to save everything permanently.
- Establish Connection:
Alternative: If you prefer us to handle the reset via mail-in service, please use this link:
Service: Reset MMSI (Shop)
Dieser Fehler kann bei den Geräten easyTRX2/S sowie den easyTRX3 Geräten auftreten.
Das ist aber kein Grund zur Panik, das können Sie selbst lösen.
Der Fehler selbst kann auftreten wenn:
- die Betriebsspannung während des Winterlagers ganz langsam sinkt und ab einem gewissen Bereich kommt, der dann zu Schreibfehlern führt (nur ältere easyTRX2 Geräte)
- Die Verbindung während eines laufenden Updatevorgangs unterbrochen wurde (z.B. durch schlechte USB-Kabel, Wackelkontakt,…, alle Geräte)
- Sie den Update-Vorgang starten wollten, während noch keine Firmware auswählt war (easyTRX3, ältere Version vom Programming-Tool < 1.8)
Fehler-Merkmal:
- Im Normal-Fall booten die Geräte beim Anschluss von 12V regulär hoch, hier blinken alle LEDs abwechseln. Ist dies aber nicht der Fall und die Warning/Error LED ist sofort aktiv, könnte eine fehlende Firmware die Ursache sein.
- Außerdem ist es Ihnen im Fehlerfall nicht möglich, sich via USB/WiFi mit dem Gerät zu verbinden.
Lösung:
Je nachdem welches Gerät Sie haben, gibt es verschiedene Lösungen:
- easyTRX2:
- Laden Sie die Firmware von hier herunter.
- Die ZIP-Datei entpacken Sie bitte um die darin enthaltene *.wdc Datei zu bekommen. Diese benötigen wir später, bitte den Pfad zur Datei merken.
- Verbinden Sie 12 oder 24V DC mit dem Gerät sowie das USB A auf A-Kabel mit dem Windows PC (MAC nicht verfügbar!).
- Öffnen Sie nun das Programming-Tool, wählen Sie den COM-Port aus, betätigen Sie aber NICHT “Connect”!
- Oben Links wählen Sie sodann File > Update aus
- Nun die voherige *.wdc Datei auswählen und “2 Start Update” betätigen.
- Der Vorgang sollte nun laufen, das Gerät am Ende wieder normal starten und laufen.
2. easyTRX3
- Laden Sie die Firmware von hier herunter.
- Die ZIP-Datei entpacken Sie bitte um die darin enthaltene *.hex Datei zu bekommen. Diese benötigen wir später, bitte den Pfad zur Datei merken.
- Trennen Sie 12 oder 24V vom Gerät, für das Update wird kein Bordnetz benötigt, trennen Sie außerdem das USB-Kabel.
- Die Geräte-LEDs sollten alle ausgeschaltet sein.
- Öffnen Sie das Programming-Tool, unten Links den Button “Info/Update” dann “FW Update“.
- Wählen Sie nun die *.hex Datei aus die Sie zuvor heruntergeladen haben.
- Verbinden Sie nun das USB-A auf Micro B-Kabel mit PC und easyTRX3, der Updatevorgang sollte automatisch starten.
- Nach dem Update-Vorgang können Sie auch wieder die 12/24V anschließen, das Gerät funktioniert nun wieder normal
Weitere Downloads finden Sie hier, z.B das Programming-Tool.