 |
| FAQ – Frequently asked questions
Frequently asked questions about our products
Do you have a question about one of our products? Take a look at our FAQ, you will often find the right answer here.
FAQ: easyTRX3
- Connect to your easyTRX2S WiFi network (network name SSID and Password are found at the bottom of your unit).
- Open your AIS Software
- Go to the Software settings page
- Select somewhere AIS data and Data source
- Source:
- Standard: TCP/IP, IP: 192.168.16.254 Port 8080
- Older WiFi-Units: TCP/IP, IP: 192.168.10.1 Port: 5101
If you software does NOT support data by TCP-IP connection, you need to generate a virtual COM-Port.
Here we recommend to use the tool from www.eterlogic.com, here TCP-Data are virtually send to a COM-Port.
This new COM-Port is the source in your AIS Software for AIS data.
When you need further assistance you can send us an email to support@weatherdock.de
The easyTRX3 has a non removeable integrated SD card.
All received AIS targets and the own position is saved.
By USB you can read-out the SD card.
To do that, please first connect the unit with the programming tool and activate that mode.
Please note that within that time, there is no recording of AIS targets and own position.
For more details please have a look into the manual or follow the instructions within the programming tool.
Storage:
We are using a 4 or 8 GB micro SD card.
With an AIS traffic of e.g. 20% you can safe up to 2 or 4 months.
Rule of thumb: 2GB per month on an AIS traffic with 20%
Exact calculation:
On an AIS traffic with 20%: 20% x 75 slots/sec = 15 Messages per sec.
Each message has 50 characters -> 15 x 50 = 750 characters.
In additon the RMC (own position) is saved which has 66 characters -> 750 + 66 = 816 characters per second
One month has 2.592.000 seconds -> 2.592.000 x 816 characters = 2.115.072.000 -> 2GB
Yes and no,
if you connect the easyTRX3 only by USB, only the microcontroller is active!
That`s fine for programming your shipdata already at home.
There is an easy reason for that:
The max. current from your USB socket is approx. 500mA.
But if the easyTRX3 should transmitt, we need for 26ms a current of 2A.
Thats absolutely too much for USB.
If you are connected by USB only, following parts are inactive:
-WiFi deactivated, if available
-GPS receiver and internal antenna deactivated
-AIS transmitter and receiver deaktivated
-NMEA2000 deactivated
If you are connected by USB only you´ll see following LEDs:
–Power
–Warning
–Error
Please connect the USB cable to your PC or Laptop directly to a free USB slot.
Using an external USB-Hub, we recommend to use one with an own external power supply.
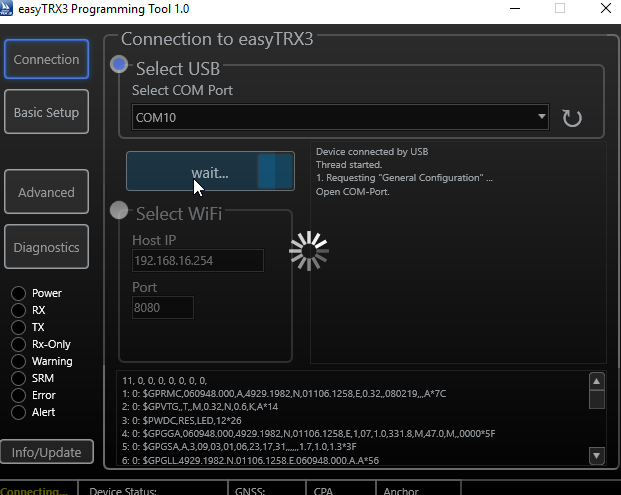
After connected well, you should see an COM-Port within the Programming-Tool.
Try the highest number first. If its not the right, just select another and press “Connect”.
You´ll be forwarded to the next page automatically.
If you don´t see any COM-Port please try to use another USB-Slot directly on your PC/Laptop.
You´ll find it here:
https://www.easyais.com/en/downloads/software-for-trx3/
Also you could search it under:
Information>Download>Software & Drivers>easyTRX3
Following instruction is only valid for our easyTRX3 units and its derivate!
If you have a older unit like easyTRX 2/S, use this Link
- Please connect by USB to your easyTRX3
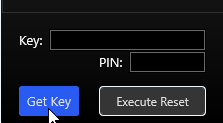
- Prese “Info/Update on the bottom left corner
- Press “Factory Reset”
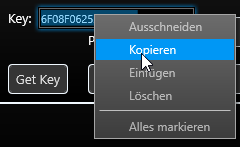
- Press “Get Key” and you´ll get 16 digits and letters
- Mark the whole Key-Field numbers/letters
- rightclick with your mouse and press “copy”
- Copy exactly that 16 digits/letters within an mail
- Send that mail with an information to reset the unit to:
- support@weatherdock.de or
- Give us a call under: +49 (0)911 376638-57.
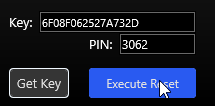
- After you received the PIN back from us please insert that four digits/numbers inside the right field

- Above picture shows an example only and is not valid for your unit. To finally do the reset, press “Execute Reset”
- The saved data on your internal storage of the easyTRX3 will not be deleted by that Factory-Reset.
- After doing the reset, the tool will be closed automatically
- Start the Programming-Tool again if you want to insert new ship datas.

With some MAC OS versions starting the easyTRX3 programming tool can cause the following error message:
“App cannot be opened because it is from an unidentified developer”
This Error comes from a Mac internal “gatekeeper”, which is supposed to prevent malware from getting onto the PC via unknown apps.
Since this tool is the first we developed for Mac, we are not yet certified here.
We assure you that our software is not infected with malware!
If you experience this error, please follow the instructions below:
https://support.apple.com/en-gb/guide/mac-help/mh40616/mac
Please check if the easyTRX3 WiFi network “easyTRX3_xxxxx” is visible with your PC/Laptop/mobilephone.
Also check if not regular reboot of the easyTRX3 happens.
You can see it when all LEDs light up regulary.
If you see regular reboot, please check your power wires.
Note that the easyTRX3-Manager app does not keep alive in background.
It is just used for programming and diagnose of the easyTRX3.
If you close app, press Home-button or lock your phone, the app disconnects from easyTRX3.
But that does not mean that you don´t get AIS-/GPS data.
The app is not required for this.
If you use an AIS app please get sure that it is able to get AIS data by TCP/IP.
Use IP 192.168.16.254 and Port 8080 within that app.
Dieser Fehler kann bei den Geräten easyTRX2/S sowie den easyTRX3 Geräten auftreten.
Das ist aber kein Grund zur Panik, das können Sie selbst lösen.
Der Fehler selbst kann auftreten wenn:
- die Betriebsspannung während des Winterlagers ganz langsam sinkt und ab einem gewissen Bereich kommt, der dann zu Schreibfehlern führt (nur ältere easyTRX2 Geräte)
- Die Verbindung während eines laufenden Updatevorgangs unterbrochen wurde (z.B. durch schlechte USB-Kabel, Wackelkontakt,…, alle Geräte)
- Sie den Update-Vorgang starten wollten, während noch keine Firmware auswählt war (easyTRX3, ältere Version vom Programming-Tool < 1.8)
Fehler-Merkmal:
- Im Normal-Fall booten die Geräte beim Anschluss von 12V regulär hoch, hier blinken alle LEDs abwechseln. Ist dies aber nicht der Fall und die Warning/Error LED ist sofort aktiv, könnte eine fehlende Firmware die Ursache sein.
- Außerdem ist es Ihnen im Fehlerfall nicht möglich, sich via USB/WiFi mit dem Gerät zu verbinden.
Lösung:
Je nachdem welches Gerät Sie haben, gibt es verschiedene Lösungen:
- easyTRX2:
- Laden Sie die Firmware von hier herunter.
- Die ZIP-Datei entpacken Sie bitte um die darin enthaltene *.wdc Datei zu bekommen. Diese benötigen wir später, bitte den Pfad zur Datei merken.
- Verbinden Sie 12 oder 24V DC mit dem Gerät sowie das USB A auf A-Kabel mit dem Windows PC (MAC nicht verfügbar!).
- Öffnen Sie nun das Programming-Tool, wählen Sie den COM-Port aus, betätigen Sie aber NICHT “Connect”!
- Oben Links wählen Sie sodann File > Update aus
- Nun die voherige *.wdc Datei auswählen und “2 Start Update” betätigen.
- Der Vorgang sollte nun laufen, das Gerät am Ende wieder normal starten und laufen.
2. easyTRX3
- Laden Sie die Firmware von hier herunter.
- Die ZIP-Datei entpacken Sie bitte um die darin enthaltene *.hex Datei zu bekommen. Diese benötigen wir später, bitte den Pfad zur Datei merken.
- Trennen Sie 12 oder 24V vom Gerät, für das Update wird kein Bordnetz benötigt, trennen Sie außerdem das USB-Kabel.
- Die Geräte-LEDs sollten alle ausgeschaltet sein.
- Öffnen Sie das Programming-Tool, unten Links den Button “Info/Update” dann “FW Update“.
- Wählen Sie nun die *.hex Datei aus die Sie zuvor heruntergeladen haben.
- Verbinden Sie nun das USB-A auf Micro B-Kabel mit PC und easyTRX3, der Updatevorgang sollte automatisch starten.
- Nach dem Update-Vorgang können Sie auch wieder die 12/24V anschließen, das Gerät funktioniert nun wieder normal
Weitere Downloads finden Sie hier, z.B das Programming-Tool.